


Chris Knowles is Digital Archivist at the Churchill Archives Centre in Cambridge, UK. He recently participated in the DPC's Digital Preservation Workflow Webinars Series and has written up his presentation.
This blog hopes to demonstrate some simple digital archiving procedures that can be done with base Windows CLI utilities run from PowerShell, without needing additional 3rd party software, and is aimed at archives with lower resources, or who are unable to use certain software due to institutional policies.
This will cover simple content analysis; logical copying; and creating and saving checksums. I’ve put the following together consulting a variety of online sources (particularly Stack Overflow), blogs/resources published by other archives, and trial and error testing.
Content analysis
To get a feeling for the material coming in I find it useful to know the file types present, how many of each there are, and the total size for each type. This might be useful for an initial appraisal of digital media, and also later on during cataloguing. This analysis absolutely is not as in-depth as the results you’d get from running TNA’s DROID – it will group anything with the same extension together, without any deeper differentiation, or checking that the extensions are correct – but it will run significantly faster.
We can run a simple command to list the file extensions that displays within PowerShell itself, which (depending on the machine you’re running this on) resolves very quickly; I ran this over 1.8TB of data consisting of 130,000 files and it completed in half a minute on my work laptop.
![]()
Here I’m getting details of all files at the working directory and below, and then listing the unique extensions.
However this command – the getting details part – is actually already gathering all the data we need for a more in-depth analysis; it’s just that we’ve asked a particularly truncated summary. We can run the following to get extensions with numbers and total file size of each.

This has the same run time as before. In order to present the total file size (‘length’ here) as GB to two decimal – as opposed to the default, which is bytes – we use more complex syntax, but it is still straightforward to edit if we wanted, for example, to use MB instead of GB (by replacing both instances of ‘gb’), or a different number of decimal places (by changing the ‘N2’ at the end).
Generally I would also sort the results, either by file size or by file count, by adding one further part to this command. We could also go further and save the results to a CSV file for later reference.

Sorting by file count

Sorting by file size

Saving the results as a CSV file, in this case to the base C: drive. You will probably want to change that final location to somewhere appropriate for your institution.
So far, all the commands have run at the active directory, which can be convenient as if you hold shift and right click in a Windows Explorer window for the directory you want to analyse, you will get a ‘Open PowerShell window here’ option that opens PowerShell with that directory active, and also means you don’t need to manually enter the target directory. You can target other directories with the -path argument, but as you will see shortly, if doing that you may as well use the slightly more complex -logicalpath argument and associated syntax which has other advantages.
The problems that can occur here are:
-
running out of memory on your machine for very high file numbers
-
particularly long file paths (those over 260 characters), or those containing special characters such as square brackets.
In the first case, if the command isn’t completing within a few minutes, check your task manager and PowerShell’s memory use. The only solutions here are to run this on a lower level directory (and so analyse fewer files at once), or if analysing external media, connect it to a machine with more memory.
Both other issues described however are easily solvable by using the -LiteralPath argument in the initial ‘Get-ChildItem’ command.

The literalpath argument is surrounded by apostrophes, and begins \\?\ (or \\?\UNC\ for network locations). Here, we are copying from the base D: drive.
Finally, a more niche analysis – summing the size of all directories in a location. While we can derive this from a full directory listing, or do it folder by folder in Windows Explorer, this should be faster than either, and can be useful for getting a feeling of how content is distributed in complex file structures.
![]()
This is again running at the active directory.
Logical copying
This following process is specifically for logical copying (material that you have decided doesn’t require disk imaging), and excludes CD-DA audio (which require a separate workflow). Here at CAC we do logical copying on all non-magnetic media[1].
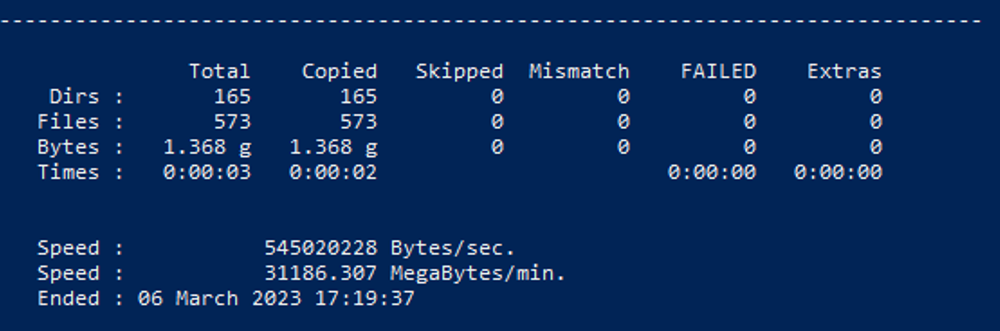
For this, we will be running the ‘robocopy’ Windows utility from within PowerShell. This is listed in TNA’s Digital Preservation Workflows guide, but the further guidance provided is only a simple summary which doesn’t do things like generate logs of the copying, and the actual documentation can be daunting[2].
![]()
This example copies from the D: drive (the default on my machine for things connected by USB) to an ‘ingest’ folder on the C: drive. The arguments we use here, in order:
-
create a full copy of the source, including blank folders, and removing anything in the target location that doesn’t exist at the source (be careful! Running this command twice on different media without changing the target directory will have the second overwrite the first entirely)
-
copy timestamps for all files and directories
-
limits to 3 retries per file that fails to copy, with a wait of 5 seconds before retrying (as the default values are very high, and could rest in a year spent copying – per file that fails to copy well!)
-
set all resulting files to read-only; you should consider whether you want this step at your institution
-
save logs of the process to a parallel folder; outputs progress to the console (eg PowerShell) window as well as the log file; and removes a progress ticker for each file (as this copies poorly to the log file).
When this completes, it shows a very useful summary window, where you can see if any files were skipped, failed, or otherwise problematic.
The target directory doesn’t need to exist to run the command above (it is created as part of it), but the location that you are saving the logs to does need to exist.
More broadly as part of copying external media on to our systems, we also capture the full directory structure of the source media (using the Get-ChildItem command again), and photograph any labels and notable features of the media and its packaging, which we store in the same ‘metadata’ folder that the copy logs were saved to.[3]
Additionally, as written the code above will overwrite the target directory each time it is run. We can manually change the target each time, but it is more user friendly to automate this, and that’s what we’ve done here at Churchill. I’ve put together a PowerShell script that asks for the collection code we’ve assigned to the material, and the drive that we are copying from (as this is not always D:), and then saves material into a folder which uses a timestamp as its name. The aim here was to remove the risk of overwriting the previous ingest with a new one unintentionally; to have a single script that could be run regardless of the collection code or drive to copy from, but equally didn’t require complex inputs each time it was run; and to gather that other metadata at the same time.

This is a bit more complex than the other things here, requires saving as a .PS1 script, and may require things like changing your execution policy within PowerShell to allow you to run scripts (to ‘RemoteSigned’).
This script is designed to copy whole drives (and indeed won’t let you give a source directory that isn’t a single drive letter), and copies to a folder on the base C: drive, which you will likely want to change. It uses a timestamp for the folders it creates which go to the minute level; if you might plausibly use this to copy more than one item a minute, you would need to tweak this (perhaps down to the second level) to ensure that no overwriting happens.
Generating checksums
This process uses PowerShell to generate MD5 checksums for each file in a directory and below, and we have two versions; the first which creates a ‘.md5’ file alongside each target file containing the checksum and using the same file name, and the second which creates a CSV file with the details of each target file and the associated checksum.

This runs at the active directory, and for each file in that, and in directories below it, generates a MD5 checksum of that file, and then saves it, along with the relative path (from the active directory), in a ‘.md5’ file that can be viewed with a text editor. An example of the contents of such a file would be ‘c2a1b08ed51d3c17205494777b680277 \TEST_1_1_1\TEST_1_1_1.jpg’ (eg the checksum, followed by a space, followed by the relative path).

This runs at a directory targeted by the -path argument (here, the ‘D:\’ drive), and for each file in that, and in directories below it, generates a MD5 checksum of that file, and then saves it, along with the directory name, file name, and file size, to a CSV file (here, at the base C: drive, which you’ll probably want to change).
I do not at this time have code to verify the MD5 files generated in the first step, as we don’t need it for our workflows here, but I believe this would be fairly straightforward to put together. The same is true for the second step, but you could easily re-derive a new CSV at the point of checking, and then compare the ‘Hash’ columns in the two CSVs to check that they are identical.
[1] An excellent resource for determining which material you want to perform logical copying on and which you want to disk image is the work of the Digital Archival traNsfer, iNgest, and packagiNg Group (DANNNG)
[2] When I do need to look things up, I tend to use this guide by adamtheautomator.com
[3] Ideally we would want to also save some other media metadata such as volume label, although I am yet to determine a way of doing this that will work for all types of external media.